Solenoid Valves Installation & Maintenance
Solenoid Valve Installation & Maintenance Instructions
Warnings 
- Installation and maintenance should be performed by a qualified person. All electrical wiring should be to AS3000-2008 if installed within Australia or to the relevant local standards when outside of Australia. Plumbing should be to AS/NZS 3500.
- Installation and maintenance should be performed by a qualified person. All electrical wiring should be to AS3000-2008 if installed within Australia or to the relevant local standards when outside of Australia. Plumbing should be to AS/NZS 3500.
- It is normal for the solenoid coil to reach quite high temperatures when continuously energised (55°C – 75°C). This heat has to be dissipated into the atmosphere so it is recommended that you provide adequate ventilation and shielding from any external heat sources.
- All watermark solenoid valves comply with both the watermark standards as well as the Lead Free requirements of the National Construction Code Volume 3.
Installation 
This guide is in accordance with AS/NZS 3500.1, AS/NZS 3500.4, AS/NZS 3500.5. This guide is mainly for two way solenoid valves however the same installation procedure will work for others including 3 way and 5 way (there will be more than two connections).

- Check the valve label for catalog number, pressure, voltage and size to ensure it is suitable for the application.
- Install the valve with the flow direction as indicated by an arrow on the body of the valve.
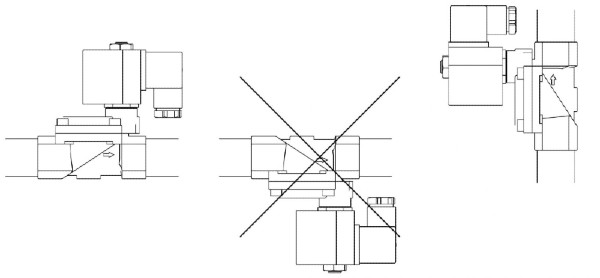
- If possible install the solenoid valve with the coil vertical (coil on top). Although the valve will work in any attitude the optimum position is with the coil uppermost so that solids do not accumulate in the armature.
- It is recommended that a strainer and isolation valve be installed close to the inlet side to provide protection and assist with servicing.
- To ensure a leak proof seal use thread tape or thread tape on threaded valves and gaskets on flanged valves.
- Do not overtighten the fittings leading into the valve, too much torque can lead to the valve body cracking especially in softer materials such as nylon.
- Try to wire the DIN plug so it faces down with a sufficient drip loop on the lead so water will not run down and into the DIN Plug.
- If the DIN plug has an LED indicator light on it this will illuminate when power is applied.
- Do not allow water to freeze within the valve or pipe work as damage can result. Either lag all exposed pipes or drain the system if prolonged freezing conditions are expected.
Maintenance 
- It is not necessary to remove the valve from the pipe work for maintenance or repair. Suitable repair kits can be ordered.
- All solenoid valves should be cleaned periodically depending on the water quality and service conditions. When a valve is clean, you can hear a small metallic click as the armature operates. Excessive noise, sluggish operation or leakage will indicate that cleaning is required.
- Replace any worn or damaged components.
- Cleaning of the strainer is recommended at the same time.
- The valve should be operated at least once every 4 weeks and checked for leakage and performance.
Troubleshooting 
For a complete troubleshooting guide for solenoid valves please click here. Some basic troubleshooting is below.
|
|
|
|
|
|
|
|
|
|
|
|
|
|
|


